
吉祥物 3D 打印设计
把品牌角色、吉祥物做成可直接打印的 FDM 桌面摆件:参数化建模、按颜色分实体、压低换色次数,并用真实切片逐层验证后再交付 3MF 工程。
帮我安装吉祥物 3D 打印设计 skill https://prompt.free2gpt.com/s/mascot-3d-print.zip,然后照这张参考图帮我做一个 6 厘米宽、三色打印的桌面吉祥物
把一个技术概念做成一台真实的小机器来讲:几十上百个精细零件的等轴测 SVG,带实时读数和交互动画,可加 WebGL 光影,输出 HTML、SVG 或 React 组件。
帮我安装等轴测机械图解 skill https://github.com/wheresryan22/anatomy,然后做一张可交互的图,把令牌桶限流的原理讲清楚
它会按这个仓库把 skill 装好,然后直接开始干活。把后半句换成你自己的任务即可。
git clone --depth 1 https://github.com/wheresryan22/anatomy.git ~/.claude/skills/anatomy
This skill makes figures like a small instrument on a bench: a heavy base on feet, rails with tick rulers, a carriage on bushings, knurled knobs, coil springs, a dial gauge whose needle moves, screws as tiny dots. The reader understands the idea because they recognise the machine. Every number the figure shows comes from the same model that moves its parts.
Eight complete examples ship with the skill. Open the closest one before you start. Each framework-free example is built with node examples/<name>/build.mjs, which writes a standalone HTML page next to the script; add --light for the light theme.
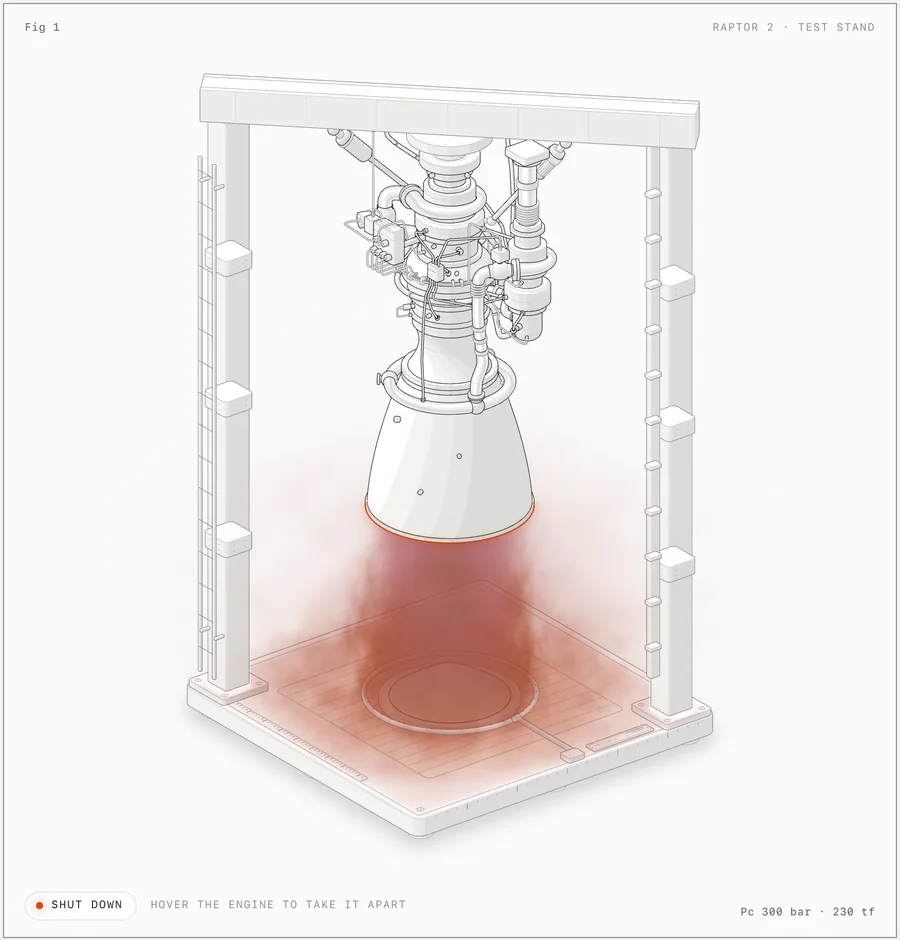
examples/dial-indicator/ is the smallest: a dial gauge on a stand, about 300 lines in all.examples/desk-computer/ is framework-free SVG: a desk computer with a keyboard you can type on. The typed line appears on a CRT screen drawn in the plane of the case front, and the picture collapses to a line and a dot when you switch it off. It has about 85 solids and 850 paths.examples/arcade-cabinet/ is an upright arcade cabinet with its side panel off, a Hero of about 240 solids and 15 cables. A quarter flies into the slot, rolls down the coin chute at the speed a rolling disc reaches on a 30° slope, trips the coin-switch wire and drops into the cash box; the switch's pulse runs chunk by chunk along its cable to the board, and the CRT warms up, self-tests and runs an attract mode drawn in the plane of the tilted monitor. The stick tilts and closes a microswitch under the panel. It shows how to place a camera so a cutaway's mechanism stays in view, a concave board drawn as a prism along any axis, moving parts rebuilt in the page from the same module the build uses, and live coins and a wire drawn in reserved slots of the settled order. node build.mjs --audit proves the geometry.examples/raptor-engine/ is a rocket engine hanging in a test stand. Its round parts come from kit/lathe.mjs and its pipes and harness from kit/tube.mjs. It comes apart into 11 assemblies with staggered springs and per-frame depth re-sorting. Every part records its true shape, and node build.mjs --audit (kit/audit.mjs) proves, at rest, apart and in every replayed frame of the explode, that nothing passes through anything, that every end sits on a real mount, that no bend pinches, folds or lands on another line, that no curved profile's slope wobbles, and that every overlap is drawn in depth order. A WebGL plume, shock, splash and steam render between the back and front SVG. It is the reference for dense pipework, smooth shading and fades.examples/ripple-tank/ is a school ripple tank on tall legs over a paper screen, seen from 44° up. Two WebGL layers (lamp light, shadows and caustics on the paper, and the water's reflections and glass) are registered to the isometric planes and driven by a pure dispersion and optics model (model.mjs); a frequency change travels out from the dippers through a history texture.examples/test-rig/ is a production figure from a real site (React/Next): a glass button on a spring-mounted carriage, a finger probe on a rail that presses and pulls, and a dial gauge reading the lean. It has 53 solids and about 470 paths.examples/spot-plate/ is a second production figure from the same site: six pairs of glass drops on a spot plate, each pair drawn from one distance field, so a pair closer than merge runs together into one piece of glass. A fan of feeler blades sets merge, one blade per gap. It is the reference for shapes that morph into each other and for one control driving many parts.examples/turning-dial/ is the optional 3D mode: a combination dial that turns in true 3D with a small robot hand on it. It has about 90 live parts in metal materials, a second turn group, a hinge, a three-hinge finger that lifts and a pod that breaks off as a free body. A WebGL LED, its light pool and sparks follow the moving parts. stress.mjs beside it is a dense hand of about 380 parts in a cluttered workshop, used to measure performance.The test rig is the quality bar for the drawing itself. The Raptor is the bar for shader work: a WebGL effect has to reach its standard of world-space, no-pop, seamless rendering.
The object is the explanation. Don't draw boxes, arrows and labels. Invent a real, well-made physical thing whose working is the concept. Here is how earlier figures mapped:
| Concept | Object |
|---|---|
| One shared GPU context serving many canvases | A gantry plotter: one print head visiting 16 wells |
| A cache key that skips work when nothing changed | A pin-tumbler lock: when every pin matches, the plug turns and nothing is redrawn |
| Seven render targets with different bytes per texel | A chest of seven drawers, each as deep as its bytes |
| A separable blur (49 × 49 taps vs 49 + 49) | A bed-of-nails stamp beside two combs on rails |
| A spring that presses and leans | A test rig with springs, a probe and a dial gauge |
| A height profile | A profile (contour) gauge pressed against the edge |
| Light that depends on facing | A small photo studio: key and fill lamps around a turntable |
Two ways this fails, both seen in practice:
The fix for both is the same: a recognisable machine, built from many small, precise, purposeful parts.
Every creation is highly detailed. This holds for every figure, however small the idea or the request: a quick explainer is still a dense, real machine, never a few slabs. What scales with the size (workflow step 1) is how far you push it: a Figure gets the 4× sweep over its subject and mechanism, a Hero or an Epic over the whole drawing.
Work in this order. Write the concept and the parts list before any geometry. Most of the quality is decided there.
date at the start and at each step, and when a step runs past twice its share of the estimate, tell the user where it stands and what is left.rig.ts in the test-rig example, and drive everything from it.references/craft.md has a vocabulary of parts with recipes.{x, y, w, d, r} and circles. Choose the camera: azimuth 45° by default, 35–60° to show the long side, elevation 30° (higher, like the ripple tank's 44°, to look into something open). Then fit with fitProjection(points, width, height, { pad, azimuth }).slabOf, cylinder, extrude, planOutline, topTicks, knurl, coil, radialTicks and so on. Round parts on any axis (bells, flanges, valves, actuators) come from kit/lathe.mjs, and pipes and cables from kit/tube.mjs. Moving parts are built once at a rest position and moved with translateAlong. Only parts whose shape changes are rebuilt per frame.depthOf. Split anything that wraps another part into a back half and a front half: the springs around a rod, the bars of a frame around a carriage. A moving part is drawn in the slot where it physically sits. See "Painter's order" in references/craft.md. Once a figure has pipes, cables and round parts, stop tuning keys by eye: record each item's shape as you put it into A.recorder(P, { order, spring }), let A.settle(R, P) measure true depth wherever two items overlap and set the keys, and end the build with A.auditOrExit(R, P). Route pipes before you draw them: real ports at both ends, legs along the structure, crossings on straights, collars gapping the pipe (references/craft.md, section 8). Record the true shape of what you draw: a stand-in shape that silences the audit is a bug, and the audit fails one. A rod that slides out of a gland is one rod from G.rodOut, recorded with A.slide.Fig n at top left, a short title at top right, the interaction hint at bottom left and the live readout at bottom right. Legend keys and a true caption go under the card, and words stay out of the drawing apart from at most one tiny engraved label.references/motion.md.scripts/capture.mjs; use scripts/drive.mjs for sequences, the apart pose and the --no-webgl fallback.node build.mjs --audit must end audit passed, every failing line at 0: clearance at rest, apart and in mid-flight, terminals, loose ends, folds, self-overlap, crowding (against slender solids too), stand-in shapes, support, wobble, saddles and depth order. Fix an interlock in the geometry, never with a key bias.node scripts/lines.mjs page.html --out shots/lines.png (and on the -light page, and in every resting pose with drive.mjs's ["lines"] action) must print line ends: 0: every seam, rule, rib, tick and pointer ends on a stroke, a dot or an outline. Read the ringed PNG.--light too), assembled and apart: every flange, tee, elbow, clamp, valve, bellows, band, saddle, ball joint and crossing, every curved body (no tone staircase), every place a texture ends (on an edge or fading), flat box faces with their seams, every textured hose at a chunk joint, every sliding rod at rest and at full stroke, and every window with text or shader content in it.["slow", 0.05] across every transition; nothing pops, no colour switch, edges read 0. In light, also log ink per frame through each transition (it must follow the light monotonically) and crop where the ink meets strokes at 8–16× (references/verify.md, "Light-theme shaders").references/verify.md.The kit is in kit/:
| File | Use it for |
|---|---|
kit/iso-kit.ts |
The whole core in one file: camera, solids, a parts library, an SVG string renderer, card and page builders, and the CSS (ISO_CSS). Copy it into a TypeScript project. |
kit/iso-kit.mjs |
The same core compiled to plain ESM, for Node scripts. Import it directly. |
kit/iso.css |
ISO_CSS written out. Import it once and put class="iso" (plus data-theme="light" for light) on a wrapper or <body>. |
kit/react/draw.tsx |
Server-safe React components: Solid, Line, Wire, Dots, FaceText, IsoFigure, Plate. |
kit/react/live.tsx |
"use client" hooks: useReadout, useLoop, useEased, useInView, useStillness, plus spring and follow. |
kit/lathe.mjs |
Round parts along any axis: frameAlong, lathe (smooth shading switches on by itself for any profile with a smooth knot), solidOf, disc, ringBand, sphereOf, saddleOf, bandsOf (one curved body cut into depth-sortable bands that share one surface, with one outline from sidesOf), visible arcs, ribs and bolt circles on round surfaces (ribsOf and dotsOf take fade, ribsOf takes seams), rodOut for a rod that slides out of a gland, and fillet for pipe routes. |
kit/tube.mjs |
tubePieces splits a 3D pipe or cable into depth-sortable chunks (with breaks, gaps under collars and clamps, elliptical end caps, and rings for a braid, corrugation or wrap that follows the cross-section through every joint), and tubeSvg draws one; crossingsOf finds where a route passes through a clamp, runsOf the drawn runs. Its .tb-* fills are in ISO_CSS. |
kit/audit.mjs |
Proves the geometry. recorder(P, { order, spring }) collects items, shapes (turned bodies, slabs, prisms, boxes, balls, tubes, pads cut by their host) and routes as the helpers draw them; settle(R, P) ray-casts every overlapping pair for true depth, at rest, apart and in the replayed explode, and sets the painter's keys (overlapsOf, orderKeys); auditOrExit(R, P) is the --audit hook that runs every check (clearances, solidClearances, terminals, looseEnds, supports, folds, selfOverlaps, crowding with slender solids as lines, coverage for stand-in shapes, wobble, seats, depthOrder) and exits non-zero on any problem. A.slide records a rod that slides out of a gland. references/kit.md, section 12. |
kit/gl.mjs |
The WebGL layer for shaders inside the drawing: GLSL_ISO (the camera in GLSL, including rayOf and pixelOf), glCamera(P), glLayer(...), and the JS envelopes smooth, burst and settle. For 3D figures, GLSL_TURN and glslPose(name) bring world points into a moving group and mask a front canvas with coverOf. |
kit/turn.mjs, kit/turn-build.mjs, kit/turn-audit.mjs |
The optional 3D mode. turn-build.mjs has turning(P, { recorder }): groups (turn, slide, hinge, free), live layers, convex parts with materials, and T.build. turn.mjs is the runtime: TURN.mount, the controller, TURN.cover, TURN.poseUniforms and TURN_CSS. turn-audit.mjs has orbitOrExit, the orbit audit over every turn angle and motion clip. references/3d.md. |
scripts/capture.mjs |
Headless Chrome screenshots, close-ups and console checks, with WebGL on. Run with node. |
scripts/drive.mjs |
Scripted headless Chrome with WebGL: move, click, key, slow motion, wait-until, eval, shots and contact sheets that catch pops; --no-webgl and --preload. |
scripts/lines.mjs |
The line-end check on a built page, in headless Chrome: every texture line must end on a stroke, a dot or an outline. Rings the failures with --out; exits 1 on any. |
scripts/inline-kit.mjs |
kitScript(), glScript() and turnScript() return the kit, the WebGL layer and the 3D runtime as source to inline into a standalone page. |
scripts/turn-check.mjs, scripts/turn-bench.mjs |
3D figures: fidelity against the kit builders, a z-buffer order check, pixel pops, line ends at 24 angles and frame timing in the browser; Node CPU time per part kind. |
Pick the path that fits the project:
examples/dial-indicator/build.mjs. It imports kit/iso-kit.mjs, assembles strings with solidSvg, lineSvg, dotsSvg, wireSvg and faceTextSvg, wraps them with figureSvg and plateHtml, and writes the page with pageHtml({ script: kitScript() + live }), or kitScript() + glScript() + live when it has a shader. For a lone .svg file use figureSvg({ standalone: "dark" | "light" }), which embeds the styles.kit/ into the project (for example components/iso/). Keep geometry in plain .ts modules, build the static art in a server component with the draw.tsx components, and pass it as element props to one "use client" live component that moves things. references/react.md explains the split and a trap with large pages.These are the rules that separate a crafted figure from a diagram. references/craft.md gives the full reasoning and recipes.
extrude returns four side tones by facing plus a lighter top. Keep it for anything with height, and use flat only for floors and inlays thinner than 1 unit.lo, structure is mid and the subject is hi. Exactly one accent is lit (white in dark, black in light): the part the reader should watch. Grooves are faint, minor ticks lo, major ticks mid and the zero mark hi. Use colour only when colour is the subject, such as red, green and blue channels.Wires whose terminal dots land on objects. There are no leader lines, balloons, dimension arrows or labels floating in the air.G.saddleOf, when the port is curved), a branch leaves from a ball tee, and every end, apart too, finishes on a flange, coupling, connector shell or terminal dot.A.settle and the audit, not tuned by eye. Lines cross on straights, well apart in depth: a bend, end or clamp that lands on another line's outline reads as a joint (a rod, tie rod, post or rail counts as a line: a pipe's last leg never runs along one on screen), a leg that points at the viewer and then turns pinches to a V (leave such a port through an elbow ball), and a route never doubles back on screen. A pair that can't be ordered interlocks, and the fix is a cut or a tangent contact, never a bias.[s, r, 1]) and lathe shades them from one monotone curve that also draws the outline; give any curved body larger than a fitting an analytic profile with smooth: { slope }, cut long bodies with G.bandsOf, and use G.sphereOf for balls. Tone bands taper to nothing instead of ending on a straight cut, and seams go under the outline (inner).ribsOf and dotsOf take fade (draw faded ribs with fadedSvg), a rib row ends on its seams (ribsOf(…, { seams: true })), a seam or weld on a box wraps its corners (k.sideSeam, as the slab's inner), a line on one face runs edge to edge, vents are closed slots, ticks hang from a ruler strip's edge, a single line that must stop ramps out with fadeLineSvg, and a row whose features face up (holes on top of a ring) is seen all round (all: true). A texture on a pipe (braid, corrugation, wrap) follows its cross-section and runs through every chunk joint: tubePieces(…, { rings }), never a dashed stroke down the centreline. A pipe's shine and shade run onto its end caps and through every chunk joint. Only rule lines that stand for printed text, a needle's tail and a pointer's tip may stop on a bare face, marked free.Use a shader only for what lines can't draw: fire and exhaust, water and caustics, real lamp light, glow, steam. The parts stay SVG. The core rules come from the first shader figure, whose colour change between phases looked cut rather than crossfaded:
pointer-events: none), and a front SVG holds what covers it. Split a part, or the effect, when it is on both sides.onFloor, onWallX and onWallY, or march the pixel's ray rayOf(vb) + t·towardViewer(). Size everything in world units times uK. Anything lying on a plane registers exactly with that plane's SVG lines.burst for events, settle for levels). Phase changes are crossfades where colour shifts continuously with the physical quantity, and a fade-out only gets darker.if, bound or canvas edge, and before any cell edge of a cell noise.references/webgl.md, section 5).tonemap() and dither. In dark, a canvas that only adds light uses premultiplied output with mix-blend-mode: screen, and one that must also darken (the ripple tank's water) stays normal-blended.references/webgl.md, section 8, has the recipes and the faults reviewers found.Read references/webgl.md before writing any shader.
3D is an option like WebGL. Use it when a part moving in depth is the idea: a dial or turntable that turns, fingers that flex, a piece that breaks off and falls. The rest of the figure stays static kit art.
It is in beta: the engine is proved on its example and one test figure, not yet on a production figure. Turn one subject at a time and keep the clutter around it static. A small figure runs at 60 fps; a dense 380-part flexing hand measured about 20 fps at 1440 and 13–15 fps on a phone profile (390 px, 4× CPU throttle) on a heavily loaded machine.
a − θ.gaps. That holds at every angle and in every pose.controller.anchor or toGroup, occlude a front canvas with coverOf, and keep world effects (smoke, falling sparks, oil on the bench) out of group space.--audit (turn audit passed) and scripts/turn-check.mjs (--fidelity, --order, --pops, --lines, --perf). Iterate with --quick --only=…. Only a full run proves the figure, and it takes 15–20 minutes for 30 parts, so run it in the background.Read references/3d.md first.
Read these as you need them:
references/craft.md: the look in depth, including the parts vocabulary with code, tone tables, painter's order patterns, round parts, pipes and harnesses, exploded views, screens on faces, and the anti-patterns that got figures rejected. Read it before designing.references/kit.md: the API, with signatures and examples.references/motion.md: live behaviour (loops, springs, tours, pointer, keyboard, accessibility, reduced motion), plus envelopes for one-shot events, exploded views, depth re-sorting and arming, in vanilla JS and React.references/react.md: the React/Next.js server/client split, element props and the large-payload key-warning trap.references/verify.md: the capture.mjs and drive.mjs commands, the review checklist (including shaders) and common faults.references/webgl.md: shaders inside the drawing: when one earns its place, the layer stack, the camera contract, ray-marching in the iso camera, the full API with a minimal page, the craft rules with the bugs that taught them, the light theme (inks on paper, per-phenomenon recipes, the reviewers' faults), and how to verify them.references/walkthrough.md: how the test rig was designed, step by step, from concept to code.references/3d.md: the optional 3D mode: groups and poses, live layers, convex parts and their rules, materials, free groups, hinge chains, painter's order, static clutter around a turntable, shaders that follow the turn, the orbit audit, browser checks, performance and limits.references/publish.md: sharing a finished figure in the community gallery with scripts/publish.mjs, only when the user asks; nothing is pushed for them.